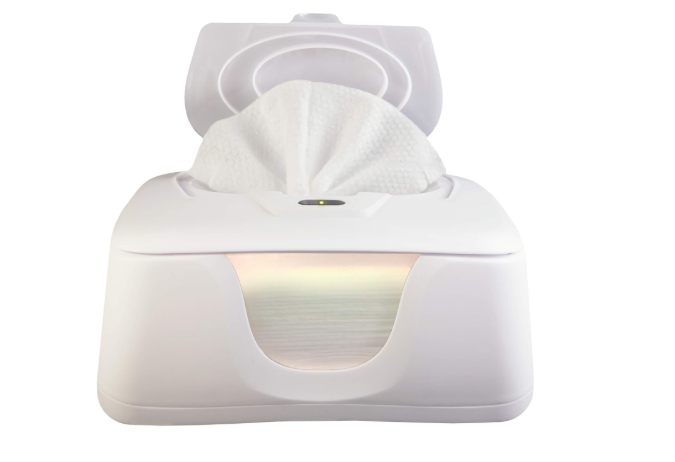
When it comes to baby care, hygiene is everything. Parents buy baby wipe warmers to provide comfort and ease during diaper changes, especially during cold weather. But while these devices are incredibly convenient, they can also become a breeding ground for bacteria and mold if not maintained properly. A warm, moist environment is exactly what bacteria love, and making regular cleaning essential to keep your little one safe.
If you’re wondering how to keep your baby wipe warmer germ-free, this complete cleaning guide will walk you through practical steps, cleaning frequency, and best practices to ensure your warmer stays safe and sanitary.
Note: To get the best outcome, invest in a quality wet wipe warmer. Here are some of the 10 best wiper warmers on Amazon today.
Why Baby Wipe Warmers Need Regular Cleaning
Baby wipes are moist, and when stored in a heated container, they create the perfect environment for microorganisms. Without proper cleaning, warmers can harbor bacteria, mold, or mildew that may transfer onto wipes and ultimately to your baby’s skin. This can cause rashes, irritation, or even infections.
Regular maintenance doesn’t just prevent bacterial growth—it also helps the warmer last longer and ensures your wipes stay fresh and effective.
How Often Should You Clean a Baby Wipe Warmer?
The frequency of cleaning depends on how often you use the warmer and the type of wipes you store in it. As a general rule:
- Light cleaning: do it every 2–3 days. Wipe down surfaces to prevent microbes and dirt buildup.
- Deep cleaning: Once a week, thoroughly clean and disinfect the warmer. Make sure that you are using safe cleaning products for the baby.
- Complete reset: Every month, unplug the warmer, remove all wipes, and sanitize it from top to bottom. This cleaning should leave the unit as good as new.
Doing this cleaning consistently will significantly deter the build-up of bacteria and dirt in the baby wipe warmer. Here are the key steps to follow:
Step-by-Step Guide to Cleaning Baby Wipe Warmers
Keeping your baby wipe warmer clean is not only about extending its life but also about ensuring your baby’s safety. A warmer provides a cozy touch to diaper changes, but because it combines heat and moisture, it can easily become a breeding ground for bacteria, mold, or mildew if neglected. Below is a detailed, step-by-step cleaning routine that will help you maintain a germ-free warmer.
1. Unplug and Empty the Warmer
Safety should always come first. Before touching the warmer, unplug it from the wall socket to prevent electrical shock. Once unplugged, open the lid and remove all the wipes stored inside. If they look dried out, discolored, or have a strange odor, discard them. Using spoiled wipes can irritate your baby’s sensitive skin, so it’s better to replace them with a fresh batch after cleaning.
2. Take Apart Removable Pieces
Most wipe warmers come with removable trays, moisture inserts, or water pads. Check your model’s manual to see which parts can be detached. Taking them out makes cleaning much easier and allows you to reach areas that might otherwise be missed. If your warmer includes a sponge or pad designed to maintain moisture, this is also the time to inspect it. Many manufacturers recommend replacing these pads every two to three months to prevent mold buildup.
3. Wipe the Interior
With the wipes removed, use a soft, damp cloth to wipe down the interior surfaces of the wipe warmer. Avoid pouring or spraying water directly inside since moisture can damage electrical components. For sticky residue or tougher buildup, lightly dampen the cloth with a mild soap solution. Be sure to rinse the cloth well so that no soap is left behind, as residue could irritate your baby’s skin when it touches the wipes.
4. Disinfect the Surfaces
To make sure bacteria and mold are eliminated, disinfect the warmer after wiping it down. The safest option is a mixture of equal parts white vinegar and water, or you can use a baby-safe disinfecting spray. Gently wipe the interior surfaces with this solution, paying extra attention to corners and crevices where moisture tends to collect. Allow the disinfectant to sit for a few minutes before wiping it off with a clean, dry cloth. Never use harsh cleaners or bleach inside the wipe warmer, as lingering chemical traces can transfer to wipes and cause skin reactions.
5. Wash Removable Parts Separately
Take the trays, lids, or pads you removed earlier and wash them in warm, soapy water. Rinse thoroughly to remove all soap residue and set them aside to air-dry completely. For parts that absorb moisture, like sponges or pads, check the manufacturer’s instructions to see whether they should be replaced instead of washed.
6. Clean the Exterior
The outside of wipe warmers also needs attention. Dust, dirt, and fingerprints can accumulate over time, especially if you handle the warmer during diaper changes. Use a damp cloth and mild soap to gently wipe down the exterior. This keeps the warmer looking clean and helps reduce the risk of dirt being transferred inside whenever you open the lid.
7. Dry Everything Thoroughly
Before reassembling the warmer, make sure every part is completely dry. Any leftover moisture inside the warmer creates the perfect environment for bacteria or mold to return. Use a clean, dry towel to pat surfaces dry, and leave thebaby wipe warmer open for 15–20 minutes to air out before plugging it back in.
8. Reassemble and Restock
Once all parts are dry, reassemble the warmer by placing the trays and pads back in their proper spots. Add a fresh pack of wipes, close the lid tightly, and plug the unit back into the wall. Your baby wipe warmer is now clean, germ-free, and ready for use again.
Final Thoughts
A baby wipe warmer can be a helpful tool, especially during those chilly nights, but it requires care to keep it safe and hygienic. By cleaning it regularly, disinfecting properly, and following best practices to prevent germ buildup, you can ensure that your baby always gets fresh, clean wipes. In addition to that, you also need to invest in the best wipe warmer brands in the market. That’s how you can get the best quality.


